กลุ่มชุมชนแลกเปลี่ยนความรู้แบ่งปั่น และช่วยเหลือ ต่อการใช้งาน OpenSource Zabbix เพราะการแบ่งปัน นั้นยิ่งใหญ่กว่า.

แสดงบทความที่มีป้ายกำกับ CentOS แสดงบทความทั้งหมด

วิธีการติดตั้ง Zabbix V 4.4.4 บน CentOS 7 ภายในเวลา 10 นาที

ในนามของสมาชิกใหม่ วันนี้ผมขอนำเสนอบทความเกี่ยวกับการติดตั้ง Zabbix Version V 4.4.4 ในแบบฉบับที่สั้นๆ และสามารถติดตั้งเสร็จได้ภายใน 10 นาที

สิ่งที่ต้องมีและติดตั้งให้เรียบร้อย คือระบบปฏิบัติการ CentOS 7
CentOS-7-x86_64-Minimal-1908
http://mirror.ku.ac.th/centos-cd-dvd/CentOS-7-x86_64-Minimal-1908.iso

หลังติดตั้ง CentOS 7 และทำการเปิดเครื่องขึ้นมาได้เรียบร้อยแล้ว

ขั้นตอนที่ 1 ให้ทำการการปิด SELinux ลง เราต้องแก้ไขไฟล์คอนฟิกของ SELinux เพื่อปิดการทำงาน โดยแก้ไขที่ไฟล์ /etc/sysconfig/selinux
[root@zabbix ~]# vi /etc/sysconfig/selinux
# This file controls the state of SELinux on the system.
# SELINUX= can take one of these three values:
#     enforcing - SELinux security policy is enforced.
#     permissive - SELinux prints warnings instead of enforcing.
#     disabled - No SELinux policy is loaded.
SELINUX=disabled
# SELINUXTYPE= can take one of three values:
#     targeted - Targeted processes are protected,
#     minimum - Modification of targeted policy. Only selected processes are protected.
#     mls - Multi Level Security protection.
SELINUXTYPE=targeted
แก้ไขตรง "SELINUX=enforcing" to "SELINUX=disabled" หลังจากนั้น ให้ บันทึกแล้ว Restart เครื่อง 1 ครั้ง

ขั้นตอนที่ 2 ให้ทำการ Update CentOS7 ก่อนทำการติดตั้ง Zabbix ด้วยคำสั่ง
[root@zabbix ~]# yum -y update
Loaded plugins: fastestmirror
Loading mirror speeds from cached hostfile
 * base: mirrors.hosting.in.th
 * extras: mirrors.hosting.in.th
 * updates: mirrors.hosting.in.th
Resolving Dependencies
--> Running transaction check
---> Package ca-certificates.noarch 0:2018.2.22-70.0.el7_5 will be updated
...
...
Updated:                          
  nss-softokn.x86_64 0:3.44.0-8.el7_7                                   nss-softokn-freebl.x86_64 0:3.44.0-8.el7_7                  
  nss-sysinit.x86_64 0:3.44.0-7.el7_7                                   nss-tools.x86_64 0:3.44.0-7.el7_7                           
  nss-util.x86_64 0:3.44.0-4.el7_7                                      numactl-libs.x86_64 0:2.0.12-3.el7_7.1                      
  python-perf.x86_64 0:3.10.0-1062.9.1.el7                              selinux-policy.noarch 0:3.13.1-252.el7_7.6                  
  selinux-policy-targeted.noarch 0:3.13.1-252.el7_7.6                   util-linux.x86_64 0:2.23.2-61.el7_7.1                       

Complete!
[root@zabbix ~]# reboot
ขั้นตอนที่ 3 หลังจาก Reboot ให้ทำการ ติดตั้ง Zabbix repository ด้วยคำสั่ง
# rpm -Uvh https://repo.zabbix.com/zabbix/4.4/rhel/7/x86_64/zabbix-release-4.4-1.el7.noarch.rpm
[root@zabbix ~]# rpm -Uvh https://repo.zabbix.com/zabbix/4.4/rhel/7/x86_64/zabbix-release-4.4-1.el7.noarch.rpm
Retrieving https://repo.zabbix.com/zabbix/4.4/rhel/7/x86_64/zabbix-release-4.4-1.el7.noarch.rpm
warning: /var/tmp/rpm-tmp.M6C21K: Header V4 RSA/SHA512 Signature, key ID a14fe591: NOKEY
Preparing...                          ################################# [100%]
Updating / installing...
   1:zabbix-release-4.4-1.el7         ################################# [100%]
ขั้นตอนที่ 4 ติดตั้ง MariaDB, Zabbix Server, Frontend, Agent ด้วยคำสั่ง
# yum install mariadb-server zabbix-server-mysql zabbix-web-mysql zabbix-agent
[root@zabbix ~]# yum install mysql zabbix-server-mysql zabbix-web-mysql zabbix-agent
Loaded plugins: fastestmirror
Loading mirror speeds from cached hostfile
 * base: mirrors.hosting.in.th
 * extras: mirrors.hosting.in.th
 * updates: mirrors.hosting.in.th
Resolving Dependencies
--> Running transaction check
---> Package mariadb.x86_64 1:5.5.64-1.el7 will be installed
...
...
  php-gd.x86_64 0:5.4.16-46.1.el7_7         php-ldap.x86_64 0:5.4.16-46.1.el7_7           php-mbstring.x86_64 0:5.4.16-46.1.el7_7 
  php-mysql.x86_64 0:5.4.16-46.1.el7_7      php-pdo.x86_64 0:5.4.16-46.1.el7_7            php-xml.x86_64 0:5.4.16-46.1.el7_7      
  t1lib.x86_64 0:5.1.2-14.el7               unixODBC.x86_64 0:2.3.1-14.el7                zabbix-web.noarch 0:4.4.4-1.el7         

Complete!
ขั้นตอนที่ 5 ทำการ config mariadb ด้วยคำสั่ง
# systemctl start mysqld # คำสั่งสำหรับ start database MariaDB
# systemctl enable mariadb # คำสั่งสำหรับกำหนดให้ start database MariaDB ทุกครั้งหากเครื่องมีการ Reboot
# systemctl status mariadb # คำสั่งสำหรับตรวจสอบว่า database MariaDB ทำงานอยู่หรือไม่
[root@zabbix ~]# [root@zabbix ~]# systemctl start mysqld
[root@zabbix ~]# [root@zabbix ~]# systemctl enable mariadb
[root@zabbix ~]# [root@zabbix ~]# systemctl status mariadb
โ— mariadb.service - MariaDB database server
   Loaded: loaded (/usr/lib/systemd/system/mariadb.service; enabled; vendor preset: disabled)
   Active: active (running) since Fri 2019-12-20 16:23:17 +07; 14s ago
 Main PID: 9752 (mysqld_safe)
   CGroup: /system.slice/mariadb.service
           โ”œโ”€9752 /bin/sh /usr/bin/mysqld_safe --basedir=/usr
           โ””โ”€9914 /usr/libexec/mysqld --basedir=/usr --datadir=/var/lib/mysql --plugin-dir=/usr/lib64/mysql/plugin --log-error=/v...

Dec 20 16:23:15 zabbix mariadb-prepare-db-dir[9666]: MySQL manual for more instructions.
Dec 20 16:23:15 zabbix mariadb-prepare-db-dir[9666]: Please report any problems at http://mariadb.org/jira
Dec 20 16:23:15 zabbix mariadb-prepare-db-dir[9666]: The latest information about MariaDB is available at http://mariadb.org/.
Dec 20 16:23:15 zabbix mariadb-prepare-db-dir[9666]: You can find additional information about the MySQL part at:
Dec 20 16:23:15 zabbix mariadb-prepare-db-dir[9666]: http://dev.mysql.com
Dec 20 16:23:15 zabbix mariadb-prepare-db-dir[9666]: Consider joining MariaDB's strong and vibrant community:
Dec 20 16:23:15 zabbix mariadb-prepare-db-dir[9666]: https://mariadb.org/get-involved/
Dec 20 16:23:16 zabbix mysqld_safe[9752]: 191220 16:23:16 mysqld_safe Logging to '/var/log/mariadb/mariadb.log'.
Dec 20 16:23:16 zabbix mysqld_safe[9752]: 191220 16:23:16 mysqld_safe Starting mysqld daemon with databases from /var/lib/mysql
Dec 20 16:23:17 zabbix systemd[1]: Started MariaDB database server.
ขั้นตอนที่ 6 ทำการสร้าง database สำหรับ Zabbix Server ด้วยคำสั่ง
# mysql # คำสั่งติดต่อเข้า database MariaDB โดยในค่าเริ่มต้นจะไม่มี password สำหรับ login
MariaDB [(none)]> create database zabbix character set utf8 collate utf8_bin;
MariaDB [(none)]> grant all privileges on zabbix.* to zabbix@localhost identified by 'password';
MariaDB [(none)]> quit;
[root@zabbix ~]# mysql
Welcome to the MariaDB monitor.  Commands end with ; or \g.
Your MariaDB connection id is 3
Server version: 5.5.64-MariaDB MariaDB Server

Copyright (c) 2000, 2018, Oracle, MariaDB Corporation Ab and others.

Type 'help;' or '\h' for help. Type '\c' to clear the current input statement.

MariaDB [(none)]> create database zabbix character set utf8 collate utf8_bin;
Query OK, 1 row affected (0.00 sec)

MariaDB [(none)]> grant all privileges on zabbix.* to zabbix@localhost identified by 'password';
Query OK, 0 rows affected (0.00 sec)

MariaDB [(none)]> quit;
Bye
ขั้นตอนที่ 7 ทำการ Import schema และ data ของ Zabbix Server ด้วยคำสั่ง ด้วย user zabbix และ password ที่เราตั้งไว้ตอนสร้าง Database ด้วยคำสั่ง
# zcat /usr/share/doc/zabbix-server-mysql*/create.sql.gz | mysql -uzabbix -ppassword zabbix
[root@zabbix ~]# zcat /usr/share/doc/zabbix-server-mysql*/create.sql.gz | mysql -uzabbix -ppassword zabbix
ขั้นตอนที่ 8 ทำการแก้ไขไฟล์ config zabbix server ด้วยคำสั่ง
# vi /etc/zabbix/zabbix_server.conf
ค้นหาคำว่า DBPassword= ให้เอาเครื่องหมาย # ออก แล้วใส่รหัสผ่านของ user zabbix ในที่นี้คือ password แล้วทำการบันทึก
#DBPassword= เปลี่ยนเป็น DBPassword=password
[root@zabbix ~]# vi /etc/zabbix/zabbix_server.conf
### Option: DBPassword
#       Database password.
#       Comment this line if no password is used.
#
# Mandatory: no
# Default:
DBPassword=password
ขั้นตอนที่ 9 ทำการแก้ไขไฟล์ config php web zabbix ด้วยคำสั่ง
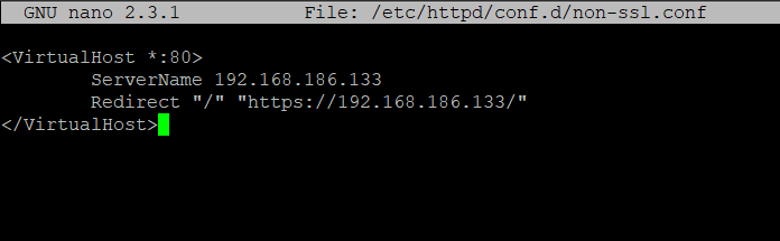
# vi /etc/httpd/conf.d/zabbix.conf
ให้เอาเครื่องหมาย # php_value date.timezone Europe/Riga ออก แล้วเปลี่ยน timezone เป็น Asia/Bangkok แล้วทำการบันทึก
#DBPassword= เปลี่ยนเป็น DBPassword=password
[root@zabbix ~]# vi /etc/zabbix/zabbix_server.conf
    
        php_value max_execution_time 300
        php_value memory_limit 128M
        php_value post_max_size 16M
        php_value upload_max_filesize 2M
        php_value max_input_time 300
        php_value max_input_vars 10000
        php_value always_populate_raw_post_data -1
        php_value date.timezone Asia/Bangkok
    
ขั้นตอนที่ 10 ทำการ start apache , zabbix server และ zabbix agent ด้วยคำสั่ง
# systemctl start zabbix-server zabbix-agent httpd # Start Apache , Zabbix server และ Zabbix agent
# systemctl enable zabbix-server zabbix-agent httpd # กำหนดให้ Start Apache , Zabbix server และ Zabbix agent ทุกครั้งที่ Reboot
[root@zabbix ~]# systemctl start zabbix-server zabbix-agent httpd
[root@zabbix ~]# systemctl enable zabbix-server zabbix-agent httpd
Created symlink from /etc/systemd/system/multi-user.target.wants/zabbix-server.service to /usr/lib/systemd/system/zabbix-server.service.
Created symlink from /etc/systemd/system/multi-user.target.wants/zabbix-agent.service to /usr/lib/systemd/system/zabbix-agent.service.
Created symlink from /etc/systemd/system/multi-user.target.wants/httpd.service to /usr/lib/systemd/system/httpd.service.
ขั้นตอนที่ 11 ทำการเปืดให้ firewall อนุญาต port สำหรับ Apache(80) Zabbix(10050,10051) ด้วยคำสั่ง
firewall-cmd --permanent --add-port=10050/tcp
firewall-cmd --permanent --add-port=10051/tcp
firewall-cmd --permanent --add-port=80/tcp
firewall-cmd --permanent --add-service=http
firewall-cmd --permanent --add-service=https
firewall-cmd --reload
[root@zabbix ~]# firewall-cmd --permanent --add-port=10050/tcp
success
[root@zabbix ~]# firewall-cmd --permanent --add-port=10051/tcp
success
[root@zabbix ~]# firewall-cmd --permanent --add-port=80/tcp
success
[root@zabbix ~]# firewall-cmd --reload
success
ขั้นตอนที่ 12 กำหนดค่าเริ่มต้นของ Zabbix Web Frontend
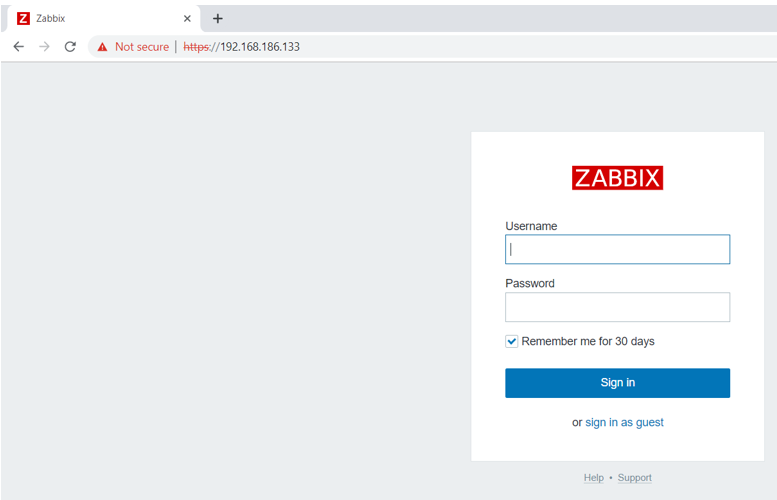
ให้เข้าไปที่ http://ตามด้วย IP Zabbix /zabbix

หน้าแรกหลังจากติดตั้ง กดปุ่ม Next step


เลื่อน scroll bar ตรวจสอบค่าเริ่มต้นจะต้องเป็น OK ทั้งหมด กดปุ่ม Next step


กำหนดค่าสำหรับติดต่อ Database Zabbix ในที่นี้เราใส่ password ของเราตรงช่องของ Password อย่างเดียว กดปุ่ม Next step


หน้าจอแสดง Infomation ของ Zabbix Server กดปุ่ม Next step


หน้าจอแสดงรายละเอียดก่อนจะเริ่มติดตั้งและพร้อมใช้งาน กดปุ่ม Next step


เย้.........เสร็จซะที กดปุ่ม Finish


หลังจากกดปุ่ม Finish จะปรากฏหน้าจอสำหรับ Login เข้าสู่ระบบในที่นี้คือ User name คือ Admin (ตัว A ต้องเป็นตัวใหญ่นะครับ) และ Password คือ zabbix


หน้าจอหลักหลังจากที่ Login ผ่าน เป็นไงกันบ้างครับ เพื่อนๆ ใช้เวลาในการติดตั้งกี่นาทีกันบ้าง อย่าลิมมา Comment ให้ด้วยนะครับ วันนี้ขอตัวก่อน สวัสดีปีใหม่ครับบบบบบบ

Share:

TimescaleDB + PostgreSQL + Zabbix Installation on CentOS7 - ความท้าทายด้านประสิทธิภาพที่มากับการเก็บข้อมูลขนาดใหญ่

การติดตั้ง TimescaleDB + PostgreSQL + Zabbix บน CentOS7 - ความท้าทายด้านประสิทธิภาพที่มากับการเก็บข้อมูลขนาดใหญ่
(TimescaleDB + PostgreSQL + Zabbix Installation on CentOS7 - Performance-related challenge with big history and trend data.)

   ได้ยินข่าวมาซักพักแล้ว สำหรับ TimescaleDB (TSDB) ที่นำมาใช้งานกับ Zabbix โดยที่ TimescaleDB คือ เป็นส่วนเสริมของ PostgreSQL (PG) ที่มีการทำงานซึ่งเพิ่มประสิทธิภาพตามอนุกรมเวลาและการเพิ่มประสิทธิภาพการจัดการข้อมูลให้กับ PostgreSQL หรือ อีกนัยนึงก็คือมีการออกแบบมาพิเศษเพื่อให้มีประสิทธิภาพการทำงานสูงสุดสำหรับข้อมูลที่มีเวลามาเกี่ยวข้อง
   (Heard the news for a while for TimescaleDB that is used with Zabbix. TimescaleDB (TSDB) is a PostgreSQL (PG)  extension, which adds time series based performance and data management optimizations to a regular PostgreSQL database. In other words, it is specially designed to provide maximum performance for time series data.)

   ซึ่งใน Zabbix นั้น ตารางในฐานข้อมูลที่เกี่ยวข้องอย่างยิ่งยวดที่เกี่ยวข้องกับเวลาคือ history, history_uint, history_str, history_log, history_text, trends and trends_uint
   (The Zabbix's database tables that related with time series data are history, history_uint, history_str, history_log, history_text, trends and trends_uint.)

   โดย TSDB นั้นจะคล้ายคลึงกับ Table Partitioning (แต่ไม่ได้เหมือนกันทั้งหมด) สำหรับ TSDB จะมีการแบ่งข้อมูลในตารางซึ่งข้อมูลที่แบ่งดังกล่าวจะเรียกว่า chunks ตามที่ได้กำหนดเวลาไว้ว่าในแต่ละอันนั้นคือเวลาช่วงละเท่าใด ซึ่งการแบ่งดังกล่าวจะดำเนินการโดยฐานข้อมูลโดยอัตโนมัติตามช่าวงเวลาที่ได้กำหนดไว้
   (In TSDB is similar to Table Partitioning (but quit difference). TSDB splits this table into so-called chunks in accordance with conditions you specify. This think of chunks as of automatically managed table partitions. Every chunk has an associated time range.)

   ในการทำ Partitioning นั้น โดยทั่วไปใน Zabbix จะมีโพรเซสที่ดำเนินการคือ Housekeeper ทำจะมี batch กำเนินการทำ partitioning ของข้อมูล เพื่อแยกข้อมูลตามช่วงเวลาที่ได้กำหนดไว้ ซึ่งในช่วงเวลาที่ housekeeper ทำการ partitioning นั้น เมื่อมีการ insert/update/delete ในช่วงเวลาดังกล่าวโดย database syncer ก็อาจเกิดการ lock ตามการทำงานของ database อีกทั้งถ้าข้อมูลมีขนาดใหญ่ ก็ยิ่งทำให้การทำงานดังกล่าวยิ่งช้าลง
   (In partitioning process, the Zabbix has batch process named "Housekeeper" that partitioning the table by time condition. Then when the database transaction such as insert/update/delete to perform operation via database synced, it may cause of database lock. In case of big table data, it have more longer process time.)

   ข้อได้เปรียบของการใช้งาน TSDB ที่สำคัญหนึ่งในหลายๆ ข้อ คือ จะช่วยเพิ่มประสิทธิภาพของ history syncer และ housekeeper
   (The one of manybenefit of TSDB is it brings considerable performance improvements for Zabbix history syncer and housekeeper.)


ขั้นตอนการติดตั้ง Zabbix 4.2 + PostgreSQL 11 + TimescaleDB 1.3 บน CentOS 7 (แถมการติดตั้ง PHP 7.2)
(Step for install Zabbix 4.2 + PostgreSQL 11 + TimescaleDB 1.3 on CentOS 7 plus PHP 7.2)

1. Install required yum related package.
   # yum install yum-utils


2. Preparing for PHP 7.2 installation (The PHP 7.2 will be installing with Zabbix frontend installation step.)
   # yum install epel-release
   # yum-config-manager --enable remi-php72

------ PostgreSQL and TimescaleDB Section ------
3. Preparing for PostgreSQL and TimescaleDB installation
   # yum install -y https://download.postgresql.org/pub/repos/yum/11/redhat/rhel-7-x86_64/pgdg-redhat-repo-latest.noarch.rpm
 
   - Add following line into file named /etc/yum.repos.d/CentOS-Base.repo, [base] and [updates] sections
      exclude=postgresql*

   - Add TimescaleDB's third party repository and install TimescaleDB, which will download any dependencies it needs from the PostgreSQL repo
   # cat > /etc/yum.repos.d/timescale_timescaledb.repo <<EOL
[timescale_timescaledb]
name=timescale_timescaledb
baseurl=https://packagecloud.io/timescale/timescaledb/el/7/\$basearch
repo_gpgcheck=1
gpgcheck=0
enabled=1
gpgkey=https://packagecloud.io/timescale/timescaledb/gpgkey
sslverify=1
sslcacert=/etc/pki/tls/certs/ca-bundle.crt
metadata_expire=300
EOL

   # yum update


4. Installing PostgreSQL + TimescaleDB
   # yum install timescaledb-postgresql-11


5. Setting PG data directory to other location (other disk/partition for increasing performance and reliability management) e.g. target directory named is /data/pgsql

   - Create target directory
   # mkdir -p /data/pgsql
   # chown -R postgres:postgres /data/pgsql

   - Setting target directory in daemon
   # systemctl edit postgresql-10.service
      [Service]
      Environment=PGDATA=/data/pgsql/11/data

   - Crosscheck this file will be created
   # cat /etc/systemd/system/postgresql-11.service.d/override.conf
      [Service]
      Environment=PGDATA=/data/pgsql/11/data

   - Reload this setting
   # systemctl daemon-reload


6. Initial PostgreSQL database
    # /usr/pgsql-11/bin/postgresql-11-setup initdb
      Initializing database ... OK


7. Tuning databs
   # timescaledb-tune --pg-config=/usr/pgsql-11/bin/pg_config --conf-path=/data/pgsql/11/data/postgresql.conf
   Using postgresql.conf at this path:
      /data/pgsql/11/data/postgresql.conf

   --> Answer yes for all questions.


8. Enable and Start PostgreSQL database
   # systemctl enable postgresql-11
   # systemctl start postgresql-11
   # systemctl status postgresql-11


------ Zabbix Section ------
9. Preparing for Zabbix installation
   # rpm -ivh https://repo.zabbix.com/zabbix/4.2/rhel/7/x86_64/zabbix-release-4.2-1.el7.noarch.rpm
   # yum-config-manager --enable rhel-7-server-optional-rpms
   # yum update


10. Installing Zabbix server
   # yum install zabbix-server-pgsql


11. Installing Zabbix frontend (PHP 7.2 will be installing with this step)
   # yum install zabbix-web-pgsql


12. Database preparation
   - Create PG database user name zabbixdbusr
   # sudo -u postgres createuser --pwprompt zabbixdbusr

   - Create database in PG named zabbix
   # sudo -u postgres createdb -O zabbixdbusr -E Unicode -T template0 zabbix

   - Import schema to database
   # zcat /usr/share/doc/zabbix-server-pgsql*/create.sql.gz | sudo -u zabbixdbusr psql zabbix

   - Enable TimescaleDB extension for zabbix database
   # echo "CREATE EXTENSION IF NOT EXISTS timescaledb CASCADE;" | sudo -u postgres psql zabbix

   - Create TimescaleDB related table (Hypertable)
   # zcat /usr/share/doc/zabbix-server-pgsql*/timescaledb.sql.gz | sudo -u zabbixdbusr psql zabbix


13. Setting database credentials to related configuration
   # vi /etc/zabbix/zabbix_server.conf
      DBHost=127.0.0.1
      DBName=zabbix
      DBUser=zabbixdbusr
      DBPassword=<password>


14. Setting PG authentication
   # vi /data/pgsql/11/data/pg_hba.conf
      host zabbix zabbixdbusr 127.0.0.1/32 password


15. Restarting PostgreSQL for reloading above configuration
   # systemctl stop postgresql-11
   # systemctl start postgresql-11
   # systemctl status postgresql-11


16. Enable and Start Zabbix server
   # systemctl enable zabbix-server
   # systemctl start zabbix-server
   # systemctl status zabbix-server


17. Setting PHP configuration that requires Zabbix
   # vi /etc/php.ini
   max_execution_time 300
   memory_limit 128M
   post_max_size 16M
   upload_max_filesize 2M
   max_input_time 300
   max_input_vars 10000
   #always_populate_raw_post_data -1
   date.timezone Asia/Bangkok


18. Enable and Start HTPD web server
   # systemctl enable httpd
   # systemctl start httpd
   #systemctl status httpd


19. Goto URL http://YOURZABBIXIP/zabbix for completing frontend installation and following installed step.
   Database type: PostgreSQL
   Database host: 127.0.0.1
   Database port: 5432
   Database name: zabbix
   User: zabbixdbusr
   Password: <password>


*** Please considering SELinux ***

Reference:
[1] https://blog.zabbix.com/zabbix-time-series-data-and-timescaledb/6642/
[2] https://www.zabbix.com/documentation/4.2/manual/installation
[3] https://docs.timescale.com/v1.3/getting-started/installation/rhel-centos/installation-yum

Share:

Enable https บน Apache ด้วย self signed certificate

สวัสดีครับ ผมขอเกริ่นก่อนว่า HTTPS คืออะไร
HTTPS (Hypertext Transfer Protocol Secure) คือโปรโตคอลการสื่อสารอินเทอร์เน็ตที่ช่วยรักษาความสมบูรณ์ถูกต้องของข้อมูลผู้ใช้และเก็บข้อมูลไว้เป็นความลับระหว่างคอมพิวเตอร์ของผู้ใช้กับเว็บไซต์ ผู้ใช้คาดหวังประสบการณ์ออนไลน์ที่มีความปลอดภัยและเป็นส่วนตัวระหว่างที่ใช้เว็บไซต์ เราขอแนะนำให้คุณใช้ HTTPS เพื่อปกป้องการเชื่อมต่อของผู้ใช้กับเว็บไซต์ ไม่ว่าเนื้อหาในเว็บไซต์จะเป็นรูปแบบใดก็ตาม
สามารถอ่านต่อได้ที่ https://support.google.com/webmasters/answer/6073543?hl=th

ซึ่งหลังจากที่เราได้ติดตั้ง Zabbix ไปแล้วทุกท่านจะทราบว่า Zabbix จะวิ่งด้วย http ซึ่งถ้าเราจะเปิดให้เข้าจาก public ได้เราควร enable https ก่อนครับ เรามาดูกันดีกว่า ว่าเราจะสามารถ enable HTTPS บน Zabbix ของเราได้อย่างไร
อย่างแรกต้องเข้าใจก่อนว่า Zabbix ของเราใช้ web service ของอะไร ในที่นี้ของผมใช้ Apache ครับ

1) Login ด้วย root
# su root

2) เราจะติดตั้ง service เพิ่ม mod_ssl เพิ่มเติมก่อนครับ
[root@localhost ~]# yum install -y mod_ssl

3) สร้าง folder สำหรับ เก็บ private key
[root@localhost ~]# mkdir /etc/ssl/private

4) เปลี่ยน permission ให้ user root สามารถเข้าถึง folder ได้อย่างเดียว
[root@localhost ~]# chmod 700 /etc/ssl/private

5) ต่อไปเราจะ Generate cert ของเรา ถ้าอยากปรับ parameter สามารถดูข้อมูลตามข้างล่างได้ครับ
[root@localhost ~]# openssl req -x509 -nodes -days 365 -newkey rsa:2048 -keyout /etc/ssl/private/apache-selfsigned.key -out /etc/ssl/certs/apache-selfsigned.crt

Country Name: ชื่อย่อที่ตั้งประเทศ ขององค์กรเจ้าของโดเมนที่จดทะเบียนถูกต้องตามกฎหมาย กรณีประเทศไทยใช้ TH
State or Province Name: ชื่อที่ตั้งจังหวัด ขององค์กรเจ้าของโดเมนที่จดทะเบียนถูกต้องตามกฎหมาย
Locality Name: ชื่อเขต อำเภอ ขององค์กรเจ้าของโดเมนที่จดทะเบียนถูกต้องตามกฎหมาย
Organization Name: ชื่อองค์กรเจ้าของโดเมนที่จดทะเบียนถูกต้องตามกฎหมาย
Organizational Unit Name: ชื่อหน่วยงานที่รับผิดชอบ เช่น IT Common name: ชื่อโดเมนจริงที่ต้องการใช้งาน SSL
E-mail Address: ใส่ email account ของผู้ดูแล SSL ของเจ้าของโดเมน


6) ต่อไปเราจะมาสร้าง Diffie-Hellman group จาก PFS (อาจจะใช้เวลามากหน่อยครับ)
[root@localhost ~]# openssl dhparam -out /etc/ssl/certs/dhparam.pem 2048

7) ซึ่งตอนแรก apache-selfsigned.crt จะยังไม่มี Parameter เราจะใช้คำสั่งทางด้านล่างเพื่อ Copy ข้อมูลไปต่อท้าย
[root@localhost ~]# cat /etc/ssl/certs/dhparam.pem | sudo tee -a /etc/ssl/certs/apache-selfsigned.crt

8) เราจะทำการแก้ไข ssl.conf ตามด้านล่างนี้ครับ
[root@localhost ~]# nano /etc/httpd/conf.d/ssl.conf

9) แก้ไขข้อมูลตามด้านล่างนี้ครับ

<VirtualHost _default_:443>
DocumentRoot "/usr/share/zabbix"                #(DocumentRoot ผมแก้ไขให้ index ไปเรียก Path ของ Zabbix)
ServerName zabbix.local:443


#   SSL Protocol support:
# List the enable protocol levels with which clients will be able to
# connect.  Disable SSLv2 access by default:
SSLProtocol all -SSLv2

#   SSL Cipher Suite:
#   List the ciphers that the client is permitted to negotiate.

#   See the mod_ssl documentation for a complete list.
SSLCipherSuite HIGH:MEDIUM:!aNULL:!MD5:!SEED:!IDEA


#   Server Certificate:
# Point SSLCertificateFile at a PEM encoded certificate.  If
# the certificate is encrypted, then you will be prompted for a
# pass phrase.  Note that a kill -HUP will prompt again.  A new
# certificate can be generated using the genkey(1) command.
SSLCertificateFile /etc/ssl/certs/apache-selfsigned.crt

#   Server Certificate:
# Point SSLCertificateFile at a PEM encoded certificate.  If
# the certificate is encrypted, then you will be prompted for a
# pass phrase.  Note that a kill -HUP will prompt again.  A new

# certificate can be generated using the genkey(1) command.
SSLCertificateKeyFile /etc/ssl/private/apache-selfsigned.key


10) Copy text ด้านล่างนี้ไปวางหลัง </VirtualHost>

</VirtualHost>

# Begin copied text
# from https://cipherli.st/
# and https://raymii.org/s/tutorials/Strong_SSL_Security_On_Apache2.html
SSLCipherSuite EECDH+AESGCM:EDH+AESGCM:AES256+EECDH:AES256+EDH
SSLProtocol All -SSLv2 -SSLv3
SSLHonorCipherOrder On
# Disable preloading HSTS for now.  You can use the commented out header line that includes
# the "preload" directive if you understand the implications.
#Header always set Strict-Transport-Security "max-age=63072000; includeSubdomains; preload"
Header always set Strict-Transport-Security "max-age=63072000; includeSubdomains"
Header always set X-Frame-Options DENY
Header always set X-Content-Type-Options nosniff
# Requires Apache >= 2.4
SSLCompression off 
SSLUseStapling on 
SSLStaplingCache "shmcb:logs/stapling-cache(150000)" 
# Requires Apache >= 2.4.11
# SSLSessionTickets Off


11) ต่อไปเราจะมี redirect http ไปเป็น https ให้ Copy ข้อความทางด้านบ่างแล้วนำไปแก้เป็น IP Zabbix ของท่าน

[root@localhost ~]# nano /etc/httpd/conf.d/non-ssl.conf

<VirtualHost *:80>
        ServerName 192.168.186.133
        Redirect "/" "https://192.168.186.133/"
</VirtualHost>


12) ให้เราทำการเทส config จาก Apache ครับ จะต้องมีคำว่า
Syntax OK

13) restart service Apache
[root@localhost ~]# systemctl restart httpd

14) ลองเข้า Server zabbix ของเราเป็น http จะกลายเป็น https ครับ


Share:

การ Access mysql/mariadb Server ด้วย Zabbix agent ในขณะที่เปิด SELinux (CentOS)

เนื่องจากผมได้ศึกษาบทความของพี่ Krit
https://zabbix-in-thailand.blogspot.com/2018/11/zabbix-server-selinux-how-to-add-policy.html

ทำให้ใช้งาน Zabbix Server ในขณะที่เปิด SELinux ได้ แต่ยังติดปัญหาเรื่อง Agent ไม่สามารถ Access (Local Access)ไปยัง mysql/mariadb Server ได้  จึงต้องทำการ add policy selinux ดังนี้

1.Create file ชื่อ zabbix_mysql.te


module zabbix_mysql 1.0;
require {
        type unconfined_t;
        type mysqld_var_run_t;
        type mysqld_etc_t;
        type mysqld_t;
        type zabbix_var_lib_t;
        type zabbix_agent_t;
        class sock_file write;
        class unix_stream_socket connectto;
        class file { read relabelto open };
        class dir relabelto;
}

#============= unconfined_t ==============
allow unconfined_t zabbix_agent_t:dir relabelto;
allow unconfined_t zabbix_agent_t:file relabelto;

#============= zabbix_agent_t ==============
allow zabbix_agent_t mysqld_etc_t:file { read open };
#!!!! This avc can be allowed using the boolean 'daemons_enable_cluster_mode'
allow zabbix_agent_t mysqld_t:unix_stream_socket connectto;
allow zabbix_agent_t mysqld_var_run_t:sock_file write;
allow zabbix_agent_t zabbix_var_lib_t:file { read open };

2.Run Command ตามนี้


checkmodule -M -m -o zabbix_mysql.mod zabbix_mysql.te

semodule_package -o zabbix_mysql.pp -m zabbix_mysql.mod

semodule -i zabbix_mysql.pp

3.Restart zabbix_agent  ก็สามารถ Access mysql/mariadb ที่เครื่องตัวเองได้แล้วครับ ถ้า Add Template DB MySQL เอาไว้ก่อนแล้ว ก็จะเห็นว่าสมารถดูข้อมูลได้แล้วครับ


Reference: https://support.zabbix.com/browse/ZBX-10782
Share:

Installation Zabbix Agent on Linux Systems


        Agent installation on Redhat  or CentOS (Update 30 Mar 2019 )

       Step.1 สำหรับท่านที่ยังไม่มี Source Zabbix ให้ทำการ ติดตั้งตัว Repository ก่อนดังนี้
     [root@zabbix ~]# rpm -ivh http://repo.zabbix.com/zabbix/4.2/rhel/7/x86_64/zabbix-agent-4.2.0-1.el7.x86_64.rpm

     [root@zabbix ~]# yum update -y
      Step.2 หากทำการติดตั้ง Repository เรียบร้อยแล้วให้ทำการติดตั้ง Zabbix Agent

       [root@zabbix ~]# yum install -y zabbix-agent
     

     หลังจากติดตั้ง Zabbix Agent เรียบร้อยแล้ว ให้ไปแก้ไข Config ของ Zabbix Agent เพื่อชี้ไปยัง Zabbix Server  เพื่อส่งข้อมูล
    [root@zabbix ~]# cd /etc/zabbix/
    ให้แก้ไขไฟล์ที่ชื่อ zabbix_agentd.conf
    [root@zabbix ~]#  vi zabbix_agentd.conf

   แก้ไขมี 3 จุด  คือ
Server = ใส่ IP Address ของ Zabbix Server

ServerActive = ใส่ IP Address ของ Zabbix Server

Hostname = ใส่ชื่อของ Zabbix Server

หลังจากนั้น ให้ บันทึกแล้วปิด

    เริ่ม Start Zabbix Agent 
     [root@zabbix ~]# systemctl start zabbix-agent

    เพื่อให้ Zabbix Agent ทำงานอัตโนมัติหากปิด หรือเปิดเครื่อง
     [root@zabbix ~]# systemctl enable zabbix-agent

เมื่อ Start Zabbix Agent แล้ว   
ขั้นตอนต่อไป ให้เปิด ฟังก์ชั้นที่  Zabbix Server 
ไปที่ Configuration ==>> Hosts ==Enable  ฟังชั่น ตรง Status โดยการคลิ๊ก Disabled เพื่อเปิดฟังก์ชั่น

อย่าลืมไปใส่ชื่อ Server ของ Zabbix ในหน้าของ Hosts ด้วยน่ะ


ผลลัพย์จะออกมาแบบนี้ 
Agent เริ่มทำงาน


Share:

วิธีทำให้ zabbix server สามารถใช้งานได้โดยไม่ต้องปิด selinux (How to add policy to selinux?)

สำหรับเพื่อนๆชาว zabbix in thailand
คงจะมีหลายคนเจอปัญหาว่า ถ้าเปิด selinux จะทำให้ไม่สามารถใช้งาน zabbix server ได้

อาการ (Symptom):
1. ไม่สามารถ start zabbix server ได้
2. เข้าหน้า web แล้วจะพบตัวเตือนว่า zabbix server อาจจะไม่ได้รันอยู่


ลองทำตามขั้นตอนนะครับ

สร้างไฟล์ ชื่อ zabbix_server.te ก่อนครับ

module zabbix_server 1.0;

require {
type fs_t;
type zabbix_t;
type zabbix_port_t;
type gssproxy_t;
type zabbix_var_run_t;
type httpd_t;
class sock_file { create unlink };
class tcp_socket name_connect;
class unix_stream_socket connectto;
class process setrlimit;
class filesystem getattr;
}

#============= gssproxy_t ==============

#!!!! This avc is allowed in the current policy
allow gssproxy_t fs_t:filesystem getattr;

#============= httpd_t ==============

#!!!! This avc can be allowed using one of the these booleans:
#     httpd_can_network_connect, httpd_can_connect_zabbix
allow httpd_t zabbix_port_t:tcp_socket name_connect;

#============= zabbix_t ==============

#!!!! This avc is allowed in the current policy
allow zabbix_t self:process setrlimit;

#!!!! This avc is allowed in the current policy
allow zabbix_t self:unix_stream_socket connectto;

#!!!! This avc is allowed in the current policy


allow zabbix_t zabbix_var_run_t:sock_file { create unlink };


แล้วรัน command ตามนี้ต่อครับ

checkmodule -M -m -o zabbix_server.mod zabbix_server.te

semodule_package -o zabbix_server.pp -m zabbix_server.mod

semodule -i zabbix_server.pp


แล้วลอง start service ครับ
ทีนี้เราจะสามารถรัน zabbix server ได้แล้วครับ

หากท่านใด เข้าใจ linux ดีแล้วก็จะเข้าใจ config นี้ครับ ส่วนวิธีการเตรียม config ไว้ติดตามใน course advance จากทางทีมงานครับ

Natthakrit Pongkanaputinad

Share:
 
Zabbix in Thailand
Facebook Group · 701 members
Join Group
กลุ่มนี้จัดตั้งขึ้นเพื่อแลกเปลี่ยนความรู้ของ zabbix ใครมีคู่มือ เทคนิค หรือ ปัญหา มาร่วมมือกันแก้ไขกันสำหรับชาวไทย -----------------------------------...
 

Popular

ค้นหาบล็อกนี้

Labels

Album (2) CentOS (6) database (3) Grafana (2) Sercurity (2) ubuntu (2) VDO (6) Windows Server (1) Zabbix-Host (11) Zabbix-Notify (1) Zabbix-Server (14)

Comments

Labels

Recent Posts